Quantcast
Channel: Hacking Tools – DigitalMunition
Viewing all 236 articles
Browse latest View live

CookieCatcher – Tool to assist in the exploitation of XSS

$
0
0
c

CookieCatcher is an open source application which was created to assist in the exploitation of XSS (Cross Site Scripting) vulnerabilities within web applications to steal user session IDs (aka Session Hijacking). The use of this application is purely educational and should not be used without proper permission from the target application.

For more information on XSS visit the following link: https://www.owasp.org/index.php/Cross-site_Scripting_(XSS)

For more information on Session Hijacking visit the following link: https://www.owasp.org/index.php/Session_hijacking_attack
Features

  • Prebuilt payloads to steal cookie data
  • Just copy and paste payload into a XSS vulnerability
  • Will send email notification when new cookies are stolen
  • Will attempt to refresh cookies every 3 minutes to avoid inactivity timeouts
  • Provides full HTTP requests to hijack sessions through a proxy (BuRP, etc)
  • Will attempt to load a preview when viewing the cookie data
  • PAYLOADS
    • Basic AJAX Attack
    • HTTPONLY evasion for Apache CVE-20120053
    • More to come

Requirements
CookieCatcher is built for a LAMP stack running the following:

  • PHP 5.x.x
  • PHP-cURL
  • MySQL
  • Lynx & crontab

Installation

  • Download the source from github git clone https://github.com/DisK0nn3cT/CookieCatcher.git or use the ZIP file and extract it on your server.
  • Setup the directory as a virtualhost in Apache (I won’t go over these details, however, you may ask me via email or you can use google.)
  • Create a database for the application and load the SETUP.sql file.
  • Setup a cron job as shown in the SETUP.cron file.

▼Advertisements

DEMO
A live demo of the application can be viewed at http://m19.us. Small domain names are recommended to cut down on the character space needed for the payloads.

Credits
@disk0nn3ct – Author danny.chrastil@gmail.com

The post CookieCatcher – Tool to assist in the exploitation of XSS appeared first on DigitalMunition.


JKS Private Key Cracker – Cracking passwords of private key entries in a JKS file

$
0
0
j
The Java Key Store (JKS) is the Java way of storing one or several cryptographic private and public keys for asymmetric cryptography in a file. While there are various key store formats, Java and Android still default to the JKS file format. JKS is one of the file formats for Java key stores, but JKS is confusingly used as the acronym for the general Java key store API as well. This project includes information regarding the security mechanisms of the JKS file format and how the password protection of the private key can be cracked. Due the unusual design of JKS the developed implementation can ignore the key store password and crack the private key password directly. Because it ignores the key store password, this implementation can attack every JKS configuration, which is not the case with most other tools. By exploiting a weakness of the Password Based Encryption scheme for the private key in JKS, passwords can be cracked very efficiently. Until now, no public tool was available exploiting this weakness. This technique was implemented in hashcat to amplify the efficiency of the algorithm with higher cracking speeds on GPUs.
To get the theory part, please refer to the POC||GTFO article “15:12 Nail in the Java Key Store Coffin” in issue 0x15 included in this repository (pocorgtfo15.pdf) or available on various mirros like this beautiful one: https://unpack.debug.su/pocorgtfo/
Before you ask: JCEKS or BKS or any other Key Store format is not supported (yet).

How you should crack JKS files
The answer is build your own cracking hardware for it 😉 . But let’s be a little more practical, so the answer is using your GPU:

    _____:  _____________         _____:  v3.6.0     ____________
   _\    |__\______    _/_______ _\    |_____ _______\______    /__ ______
   |     _     |  __   \   ____/____   _     |   ___/____  __    |_______/
   |     |     |  \    _\____      /   |     |   \      /  \     |     |
   |_____|     |______/     /     /____|     |_________/_________:     |
         |_____:-aTZ!/___________/     |_____:                 /_______:

* BLAKE2 * BLOCKCHAIN2 * DPAPI * CHACHA20 * JAVA KEYSTORE * ETHEREUM WALLET *

All you need to do is run the following command:

java -jar JksPrivkPrepare.jar your_JKS_file.jks > hash.txt

If your hash.txt ends up being empty, there is either no private key in the JKS file or you specified a non-JKS file.
Then feed the hash.txt file to hashcat (version 3.6.0 and above), for example like this:

$ ./hashcat -m 15500 -a 3 -1 '?u|' -w 3 hash.txt ?1?1?1?1?1?1?1?1?1
hashcat (v3.6.0) starting...

OpenCL Platform #1: NVIDIA Corporation
======================================
* Device #1: GeForce GTX 1080, 2026/8107 MB allocatable, 20MCU

Hashes: 1 digests; 1 unique digests, 1 unique salts
Bitmaps: 16 bits, 65536 entries, 0x0000ffff mask, 262144 bytes, 5/13 rotates

Applicable optimizers:
* Zero-Byte
* Precompute-Init
* Not-Iterated
* Appended-Salt
* Single-Hash
* Single-Salt
* Brute-Force

Watchdog: Temperature abort trigger set to 90c
Watchdog: Temperature retain trigger set to 75c

$jksprivk$*D1BC102EF5FE5F1A7ED6A63431767DD4E1569670...8*test:POC||GTFO

Session..........: hashcat
Status...........: Cracked
Hash.Type........: JKS Java Key Store Private Keys (SHA1)
Hash.Target......: $jksprivk$*D1BC102EF5FE5F1A7ED6A63431767DD4E1569670...8*test
Time.Started.....: Tue May 30 17:41:58 2017 (8 mins, 25 secs)
Time.Estimated...: Tue May 30 17:50:23 2017 (0 secs)
Guess.Mask.......: ?1?1?1?1?1?1?1?1?1 [9]
Guess.Charset....: -1 ?u|, -2 Undefined, -3 Undefined, -4 Undefined
Guess.Queue......: 1/1 (100.00%)
Speed.Dev.#1.....:  7946.6 MH/s (39.48ms)
Recovered........: 1/1 (100.00%) Digests, 1/1 (100.00%) Salts
Progress.........: 4014116700160/7625597484987 (52.64%)
Rejected.........: 0/4014116700160 (0.00%)
Restore.Point....: 5505024000/10460353203 (52.63%)
Candidates.#1....: NNVGFSRFO -> Z|ZFVDUFO
HWMon.Dev.#1.....: Temp: 75c Fan: 89% Util:100% Core:1936MHz Mem:4513MHz Bus:1

Started: Tue May 30 17:41:56 2017
Stopped: Tue May 30 17:50:24 2017

So from this repository you basically only need the JksPrivkPrepare.jar to run a cracking session.

Other things in this repository

  • test_run.sh: A little test script that you should be able to run after a couple of minutes to see this project in action. It includes comments on how to setup the dependencies for this project.
  • benchmarking: tests that show why you should use this technique and not others. Please read the “Nail in the JKS coffin” article.
  • example_jks: generate example JKS files
  • fingerprint_creation: Every plaintext private key in PKCS#8 has it’s own “fingerprint” that we expect when we guess the correct password. These fingerprints are necessary to make sure we are able to detect when we guessed the correct password. Please read the “Nail in the JKS coffin” article. This folder has the code to generate these fingerprints, it’s a little bit hacky but I don’t expect that it will be necessary to add any other fingerprints ever.
  • JksPrivkPrepare: The source code of how the JKS files are read and the hash calculated we need to give to hashcat.
  • jksprivk_crack.py: A proof of concept implementation that can be used instead of hashcat. Obviously this is much slower than hashcat, but it can outperform John the Ripper (JtR) in certain cases. Please read the “Nail in the JKS coffin” article.
  • jksprivk_decrypt.py: A little helper script that can be used to extract a private key once the password was correctly guessed.
  • run_example_jks.sh: A script that runs JksPrivkPrepare.jar and jksprivk_crack.py on all example JKS files in the example_jks folder. Make sure you run the generate_examples.py in example_jks script before.

Related work and further links
A big shout to Casey Marshall who wrote the JKS.java class, which is used in a modified version in this project:

/* JKS.java -- implementation of the "JKS" key store.
   Copyright (C) 2003  Casey Marshall <rsdio@metastatic.org>

Permission to use, copy, modify, distribute, and sell this software and
its documentation for any purpose is hereby granted without fee,
provided that the above copyright notice appear in all copies and that
both that copyright notice and this permission notice appear in
supporting documentation.  No representations are made about the
suitability of this software for any purpose.  It is provided "as is"
without express or implied warranty.

▼Advertisements

This program was derived by reverse-engineering Sun's own implementation, using only the public API that is available in the 1.4.1 JDK. Hence nothing in this program is, or is derived from, anything copyrighted by Sun Microsystems. While the "Binary Evaluation License Agreement" that the JDK is licensed under contains blanket statements that forbid reverse-engineering (among other things), it is my position that US copyright law does not and cannot forbid reverse-engineering of software to produce a compatible implementation. There are, in fact, numerous clauses in copyright law that specifically allow reverse-engineering, and therefore I believe it is outside of Sun's power to enforce restrictions on reverse-engineering of their software, and it is irresponsible for them to claim they can. */

Various more information which are mentioned in the article as well:

Neighborly greetings go out to atom, vollkorn, cem, doegox, corkami, xonox and rexploit for supporting this research in one form or another!

The post JKS Private Key Cracker – Cracking passwords of private key entries in a JKS file appeared first on DigitalMunition.

XSStrike v1.2 – Fuzz, Crawl and Bruteforce Parameters for XSS

$
0
0
x

XSStrike is a python script designed to detect and exploit XSS vulnerabilites.
A list of features XSStrike has to offer:

  • Fuzzes a parameter and builds a suitable payload
  • Bruteforces paramteres with payloads
  • Has an inbuilt crawler like functionality
  • Can reverse engineer the rules of a WAF/Filter
  • Detects and tries to bypass WAFs
  • Both GET and POST support
  • Most of the payloads are hand crafted
  • Negligible number of false positives
  • Opens the POC in a browser window

Installing XSStrike

Use the following command to download it

git clone https://github.com/UltimateHackers/XSStrike/

After downloading, navigate to XSStrike directory with the following command

cd XSStrike

Now install the required modules with the following command

pip install -r requirements.txt

Now you are good to go! Run XSStrike with the following command

python xsstrike

Using XSStrike

You can enter your target URL now but remember, you have to mark the most crucial parameter by inserting “d3v<” in it.
For example: target.com/search.php?q=d3v&category=1
After you enter your target URL, XSStrike will check if the target is protected by a WAF or not. If its not protected by WAF you will get three options

1. Fuzzer: It checks how the input gets reflected in the webpage and then tries to build a payload according to that.

2. Striker: It bruteforces all the parameters one by one and generates the proof of concept in a browser window.

3. Spider: It extracts all the links present in homepage of the target and checks parameters in them for XSS.

4. Hulk: Hulk uses a different approach, it doesn’t care about reflection of input. It has a list of polyglots and solid payloads, it just enters them one by one in the target parameter and opens the resulted URL in a browser window.

XSStrike can also bypass WAFs

▼Advertisements

XSStrike supports POST method too

You can also supply cookies to XSStrike

Demo video

Credits
XSStrike uses code from BruteXSS and Intellifuzzer-XSS, XsSCan.

The post XSStrike v1.2 – Fuzz, Crawl and Bruteforce Parameters for XSS appeared first on DigitalMunition.

Faraday v2.6 – Collaborative Penetration Test and Vulnerability Management Platform

$
0
0
f
Faraday is the Integrated Multiuser Risk Environment you were looking for! It maps and leverages all the knowledge you generate in real time, letting you track and understand your audits. Our dashboard for CISOs and managers uncovers the impact and risk being assessed by the audit in real-time without the need for a single email. Developed with a specialized set of functionalities that helps users improve their own work, the main purpose is to re-use the available tools in the community taking advantage of them in a collaborative way!

Managing your assessments

In the last couple of versions we added several features to allow our users to manage more and more parts of their engagements directly from our platform so we realized, why not also add the option to manage methodologies and tasks? And so we did!

Kanban Tasks View

Now you can create your custom methodologies, add tasks, tag them and keep track of your whole project directly from Faraday.

Improving the Data Analysis tools

As per your requests, we made some changes to the existing Data Analysis tools introduced in the last release. We added the possibility to change data configuration in order to customize charts, a new bar chart type to show most vulnerable services and a filter for undefined or null values.

Most vulnerable services

Modal to set chart properties

Charts customization

Executive Report clean up

Some users reported issues with the sorting of Hosts and Evidence in the reports. We fixed it so the hosts in grouped reports are sorted by IP and evidence is sorted by alphabetically by name.

Targets are sorted by IP

Evidence names sorted alphabetically

We know sometimes it is necessary to use special characters for evidence names. Some of our users

Web UI

Now you can manually create the same vulnerability in several hosts at once! Select as many targets as you want when creating your vulns.

Add vuln to multiple targets at once

▼Advertisements

Also, we made the vulnerability creation modal more consistent with the rest of the views by starting the pagination of the targets in page 1 instead of 0.

Changes:

  • Improved Data analysis charts. Added more chart properties and data binding
  • Improved target ordering in grouped reports
  • Fixed bug with new line character in reports DOCX
  • Adds alphabetical sort for Evidence in the Executive Report
  • Fix bug updating users with no roles
  • Fixed report creation with evidence names containing special chars
  • Added Tasks Management to the Web UI
  • Added the ability to select more than one target when creating a vuln in the Web UI
  • Merged PR #182 – problems with zonatransfer.me
  • Fixed bug in Download CSV of Status report with old versions of Firefox
  • Fixed formula injection vulnerability in export to CSV feature
  • Fixed DOM-based XSS in the Top Services widget of the dashboard
  • Fix in AppScan plugin
  • Fix HTML injection in Vulnerability template
  • Add new plugin: Junit XML
  • Improved pagination in new vuln modal of status report
  • Added “Policy Violations” field for Vulnerabilities

The post Faraday v2.6 – Collaborative Penetration Test and Vulnerability Management Platform appeared first on DigitalMunition.

Mercure – A Tool For Security Managers Who Want To Train Their Colleague To Phishing

$
0
0
m

Mercure is a tool for security managers who want to teach their colleagues about phishing.

What Mercure can do:

  • Create email templates
  • Create target lists
  • Create landing pages
  • Handle attachments
  • Let you keep track in the Campaign dashboard
  • Track email reads, landing page visits and attachment execution.
  • Harvest credentials

What Mercure will do:

  • Display more graphs (we like graphs!)
  • Provide a REST API
  • Allow for multi-message campaigns (aka scenarios)
  • Check browser plugins
  • User training

Docker Quickstart

Requirements

  • docker

Available configuration

Environment variable name Status Description Value example
SECRET_KEY Required Django secret key Random string
URL Required Mercure URL https://mercure.example.com
EMAIL_HOST Required SMTP server mail.example.com
EMAIL_PORT Optional SMTP port 587
EMAIL_HOST_USER Optional SMTP user phishing@example.com
EMAIL_HOST_PASSWORD Optional SMTP password P@SSWORD
DEBUG Optional Run on debug mode True
SENTRY_DSN Optional Send debug info to sentry.io https://23xxx:38xxx@sentry.io/1234
AXES_LOCK_OUT_AT_FAILURE Optional Ban on forcebrute login True
AXES_COOLOFF_TIME Optional Ban duration on forcebrute login (in hours) 0.8333
DONT_SERVES_STATIC_FILE Optional Don’t serve static files with django True

Sample deployment

# create container
docker run \
    -d \
    --name=mercure \
    -e SECRET_KEY=$(cat /dev/urandom | tr -dc 'a-zA-Z0-9' | fold -w 200 | head -n 1) \
    -e URL=https://mercure.example.com \
    -e EMAIL_HOST=mail.example.com \
    -e EMAIL_PORT=587 \
    -e EMAIL_HOST_USER=phishing@example.com \
    -e EMAIL_HOST_PASSWORD=P@SSWORD \
    synhackfr/mercure

# create super user
docker exec -it mercure python manage.py createsuperuser

Git Quickstart

Requirements

  • python3
  • pip

Deployment

git clone git@bitbucket.org:synhack/mercure.git && cd mercure
pip install -r requirements.txt
./manage.py makemigrations
./manage.py migrate
./manage.py collectstatic
./manage.py createsuperuser
./manage.py runserver

How to use mercure
We can consider mercure is divide between 4 categories :

  • Targets
  • Email Templates
  • Attachments and landing page
  • Campaigns

Targets, Email Templates and Campaign are the minimum required to run a basic phishing campaign.

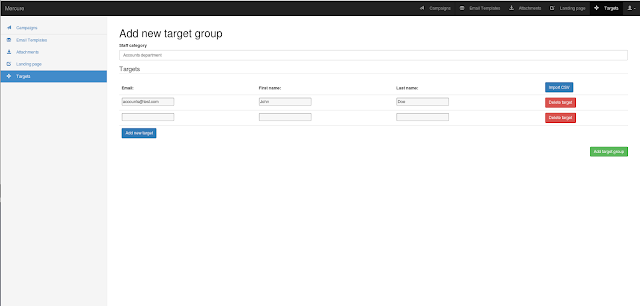
  1. First, add your targets

    You need to fill mercure name, the target email.Target first and last name are optional, but can be usefull to the landing page

▼Advertisements

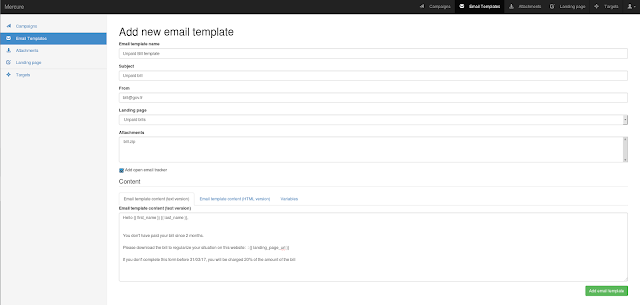
  1. Then, fill the email template.

    You need to fill the mercure name, the subject, the send and the email content. To improve the email quality, you have to fill the email content HTML and the text content. To get information about opened email, check “Add open email tracker” You can be helped with “Variables” category.
    Attachments and landing page are optionnal, we will see it after.

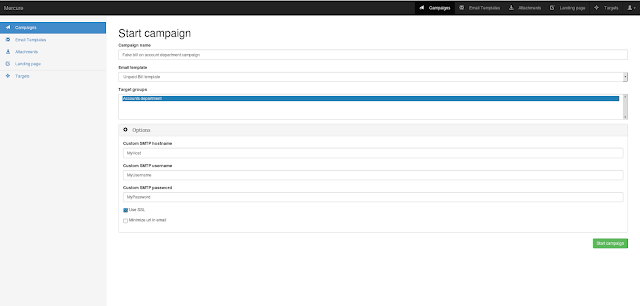
  2. Finally, launch the campaign

    You need to fill the mercure name, select the email template and the target group. You can select the SMTP credentials, SSL using or URL minimazing

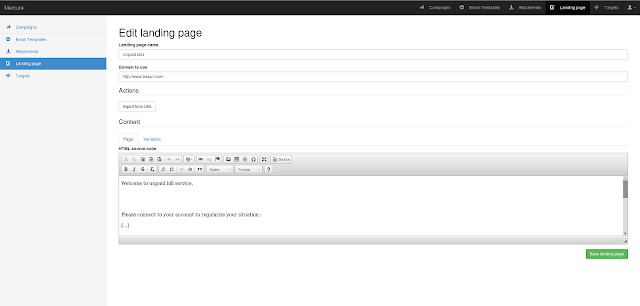
  3. Optional, add landing page

    You need to fill the mercure name, the domain to use You can use “Import from URL” to copy an existing website.
    You have to fill the page content with text and HTML content by clicking to “Source”

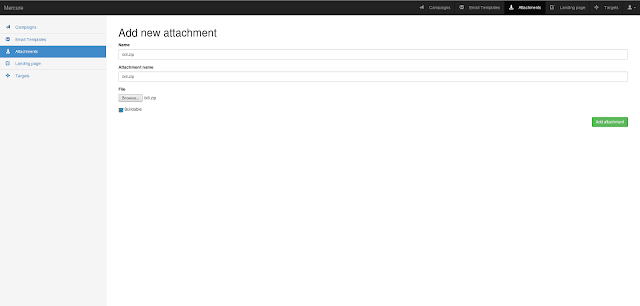
  4. Optional, add Attachment

    You need to fill the mercure name, the file name which appears in the email and the file You also have to check if the the file is buildable or not, if you need to compute a file for example.
    To execute the build , you need to create a zip archive which contain a build script (named ‘generator.sh’ and a buildable file


The post Mercure – A Tool For Security Managers Who Want To Train Their Colleague To Phishing appeared first on DigitalMunition.

WiFi Bruteforcer – Android application to brute force WiFi passwords (No Root Required)

Jack – Drag & Drop Clickjacking Tool For PoCs

$
0
0
j

Jack is a Drag and Drop web-based Clickjacking Tool for the assistance of development in PoCs made with static HTML and JavaScript.

Jack is web based and requires either a web server to serve its HTML and JS content or can be run locally. Typically something like Apache will suffice but anything that is able to serve HTML content to a browser will do. Simply download Jack’s contents and open “index.html” with your browser locally and Jack is ready to go.

▼Advertisements

Alternatively, if you prefer the older UI for Jack, open “oldIndex.html” with your browser for the old UI.

Features

Jack comes with three additional pages; sandbox.html, targetLogin.html and targetRead.html. targetRead.html can be used to demonstrate Clickjacking that reads values from a page and sandbox.html is used to display the Clickjacking demonstration. Jack by default loads the “Read” html page with default CSS and Styles.

Jack allows you to configure a few parameters (X&Y positions, Style tags) that can be used to demonstrate Clickjacking.

You can download Jack here:

jack-master.zip

Or read more here.

The post Jack – Drag & Drop Clickjacking Tool For PoCs appeared first on DigitalMunition.

lscript – This script will make your life easier, and of course faster

$
0
0
l

This is a script that automates many procedures about wifi penetration and hacking.

Features

Enabling-Disabling interfaces faster Changing Mac faster Anonymizing yourself faster View your public IP faster View your MAC faster
TOOLS

You can install whichever tool(s) you want from within lscript!
Fluxion    by Deltaxflux
WifiTe    by derv82
Wifiphisher   by Dan McInerney
Zatacker   by LawrenceThePentester
Morpheus   by Pedro ubuntu  [ r00t-3xp10it ]
Osrframework   by i3visio
Hakku    by 4shadoww
Trity    by Toxic-ig
Cupp    by Muris Kurgas
Dracnmap   by Edo -maland-
Fern Wifi Cracker  by Savio-code
Kichthemout   by Nikolaos Kamarinakis & David SchĂźtz
BeeLogger   by Alisson Moretto - 4w4k3
Ghost-Phisher   by Savio-code
Mdk3-master                     by Musket Developer
Anonsurf                        by Und3rf10w
The Eye                         by EgeBalci
Airgeddon                       by v1s1t0r1sh3r3
Xerxes                          by zanyarjamal
Ezsploit                        by rand0m1ze
Katana framework                by PowerScript
4nonimizer                      by Hackplayers
Sslstrip2                       by LeonardoNve
Dns2proxy                       by LeonardoNve
Pupy                            by n1nj4sec
Zirikatu                        by pasahitz
TheFatRat                       by Sceetsec
Angry IP Scanner                by Anton Keks
Sniper                          by 1N3
ReconDog                        by UltimateHackers
RED HAWK                        by Tuhinshubhra
Routersploit                    by Reverse shell
CHAOS                           by Tiagorlampert
Winpayloads                     by Ncc group 

Wifi password scripts

Handshake       (WPA-WPA2)
Find WPS pin    (WPA-WPA2)
WEP hacking     (WEP)    

Others

Email spoofing
Metasploit automation (create payloads,listeners,save listeners for later etc...)
Auto eternalblue exploiting (check on ks) -> hidden shortcuts

How to install
(make sure you are a root user)
Be carefull.If you download it as a .zip file, it will not run.Make sure to follow these simple instructions.

cd
git clone https://github.com/arismelachroinos/lscript.git
cd lscript
chmod +x install.sh
./install.sh

How to run it
(make sure you are a root user)

open terminal
type  "l"
press enter

(Not even “lazy”!! Just “l”! The less you type , the better!)

How to uninstall

cd /root/lscript
./uninstall.sh
rmdir -r /root/lscript 

How to update

Run the script
Type "update"

Things to keep in mind
1)you should be a root user to run the script
2)you should contact me if something doesnt work (Write it on the “issues” tab at the top)
3)you should contact me if you want a feature to be added (Write it on the “issues” tab at the top)

Video

Screenshots

▼Advertisements


The post lscript – This script will make your life easier, and of course faster appeared first on DigitalMunition.


CyberChef – The Cyber Swiss Army Knife [A Web App For Encryption, Encoding, Compression And Data Analysis]

$
0
0
c
The Cyber Swiss Army Knife
CyberChef is a simple, intuitive web app for carrying out all manner of “cyber” operations within a web browser. These operations include simple encoding like XOR or Base64, more complex encryption like AES, DES and Blowfish, creating binary and hexdumps, compression and decompression of data, calculating hashes and checksums, IPv6 and X.509 parsing, changing character encodings, and much more.
The tool is designed to enable both technical and non-technical analysts to manipulate data in complex ways without having to deal with complex tools or algorithms. It was conceived, designed, built and incrementally improved by an analyst in their 10% innovation time over several years. Every effort has been made to structure the code in a readable and extendable format, however it should be noted that the analyst is not a professional developer.
Live demo
CyberChef is still under active development. As a result, it shouldn’t be considered a finished product. There is still testing and bug fixing to do, new features to be added and additional documentation to write. Please contribute!
Cryptographic operations in CyberChef should not be relied upon to provide security in any situation. No guarantee is offered for their correctness.
How it works
There are four main areas in CyberChef:
  1. The input box in the top right, where you can paste, type or drag the data you want to operate on.
  2. The output box in the bottom right, where the outcome of your processing will be displayed.
  3. The operations list on the far left, where you can find all the operations that CyberChef is capable of in categorised lists, or by searching.
  4. The recipe area in the middle, where you can drag the operations that you want to use and specify arguments and options.
You can use as many operations as you like in simple or complex ways. Some examples are as follows:

Features

  • Drag and drop
    • Operations can be dragged in and out of the recipe list, or reorganised.
    • Files can be dragged over the input box to load them directly.
  • Auto Bake
    • Whenever you modify the input or the recipe, CyberChef will automatically “bake” for you and produce the output immediately.
    • This can be turned off and operated manually if it is affecting performance (if the input is very large, for instance).
    • If any bake takes longer than 200 milliseconds, auto bake will be switched off automatically to prevent further performance issues.
  • Breakpoints
    • You can set breakpoints on any operation in your recipe to pause execution before running it.
    • You can also step through the recipe one operation at a time to see what the data looks like at each stage.
  • Save and load recipes
    • If you come up with an awesome recipe that you know you’ll want to use again, just click save and add it to your local storage. It’ll be waiting for you next time you visit CyberChef.
    • You can also copy a URL which includes your recipe and input which can be shared with others.
  • Search
    • If you know the name of the operation you want or a word associated with it, start typing it into the search field and any matching operations will immediately be shown.
  • Highlighting
  • Save to file and load from file
    • You can save the output to a file at any time or load a file by dragging and dropping it into the input field (note that files larger than about 500kb may cause your browser to hang or even crash due to the way that browsers handle large amounts of textual data).
  • CyberChef is entirely client-side
    • It should be noted that none of your input or recipe configuration is ever sent to the CyberChef web server – all processing is carried out within your browser, on your own computer.
    • Due to this feature, CyberChef can be compiled into a single HTML file. You can download this file and drop it into a virtual machine, share it with other people, or use it independently on your desktop.

Browser support
CyberChef is built to support

  • Google Chrome 40+
  • Mozilla Firefox 35+
  • Microsoft Edge 14+


The post CyberChef – The Cyber Swiss Army Knife [A Web App For Encryption, Encoding, Compression And Data Analysis] appeared first on DigitalMunition.

WS-Attacker v1.8 – Modular Framework For Web Services Penetration Testing

$
0
0
w
WS-Attacker is a modular framework for web services penetration testing. It is developed by the Chair of Network and Data Security, Ruhr University Bochum (http://nds.rub.de/ ) and the Hackmanit GmbH (http://hackmanit.de/ ).
The basic idea behind WS-Attacker is to provide a functionality to load WSDL files and send SOAP messages to the Web Service endpoints (which is executed using the underlying SoapUI framework). This functionality can be extended using various plugins and libraries to build specific Web Services attacks. You can find more information on the WS-Attacker architecture and its extensibility in our paper: Penetration Testing Tool for Web Services Security (https://www.nds.rub.de/research/publications/ws-attacker-paper/)


In the current version, WS-Attacker supports the following attacks:

Obtaining Runnable File
The first option to obtain a WS-Attacker jar file is from the sourceforge website: http://sourceforge.net/projects/ws-attacker/files/
The second option is to build it directly from the Github sources. For this purpose, you need:

  • Java 7 or higher
  • maven
  • git

You procede as follows. You first need to clone WS-Attacker sources (you can of course also download a ZIP file):

$ git clone https://github.com/RUB-NDS/WS-Attacker.git 

Then you go to the WS-Attacker directory and use maven to build and package the files:

$ cd WS-Attacker
$ mvn clean package -DskipTests

Afterwards, you are able to go to the runnable directory and execute WS-Attacker:

$ cd runnable
$ java -jar WS-Attacker-1.9-SNAPSHOT.jar

▼Advertisements

WS-Attacker Usage

You can find the latest documentation on XML Signature Wrapping and DoS attacks here: http://sourceforge.net/projects/ws-attacker/files/WS-Attacker%201.3/Documentation-v1.3.pdf/download
The documentation on XML Encryption attacks is currently under development, but you can find a lot of information on the XML Encryption plugin and on starting XML Encryption attacks here: http://web-in-security.blogspot.de/2015/05/how-to-attack-xml-encryption-in-ibm.html
If you want to practice the attacks and you do not have any Web Service, we encourage you to use the Apache Rampart framework. This framework provides several Web Services examples and is vulnerable to the most of the provided attacks, including XML Signature Wrapping and the attacks on XML Encryption.
See this blog post on how to use WS-Attacker to attack Apache Rampart Web Services with XML Signatures: http://web-in-security.blogspot.de/2015/04/introduction-to-ws-attacker-xml.html Similar concepts apply to the attacks with XML Encryption.
Happy Web Service hacking


The post WS-Attacker v1.8 – Modular Framework For Web Services Penetration Testing appeared first on DigitalMunition.

BAF – Blind Attacking Framework

$
0
0
b

What is BAF ?

  • it’s a framework written in python [2.7] that is being made specially for blind attacking , ie : attacking random targets with common security issues , targets are generated by the hackers search engine “shodan” and vulnerable hosts are hacked in an automated way .
  • this framework is completely “neutral” ie: it’s not based on shodan API and it has total dependence on web scraping , ie: the only limit on what you can do with it is your immagination as a tester & our programming skills as contributers/owners .

how to use BAF ?

  • fire up a terminal and sudo apt-get update && apt-get upgrade && apt-get dist-upgrade
  • install [ requests , httplib , urllib , time , bs4 “BeautifulSoup” , colored , selenium , sys ] python modules
  • python BAF_0.1.0.py
  • enter your shodan’s account username and pass
  • choose 1 , let it do it’s job , press y , close the previous tab , press y ,close the previous tabs …etc till u have the vulnerable cams only
  • choose 2 , enter what do u want to search for (ie: NSA) , when it’s done , refer to the targets text file , it will contain the targets ip:port
  • that’s all , till now 🙂
  • DON’T close a loading webpage
  • beta versions will make automated browser open for better understanding ,but you can close the webcam tabs freely
 

▼Advertisements

Screenshots


The post BAF – Blind Attacking Framework appeared first on DigitalMunition.

pydictor – A Powerful and Useful Hacker Dictionary Builder for a Brute-Force Attack

$
0
0
p
pydictor is a powerful and useful hacker dictionary builder for a brute-force attack.

Why I need to use pydictor ?

 
1. it always can help you
You can use pydictor to generate a general blast wordlist, a custom wordlist based on Web content, a social engineering wordlist, and so on. You can use the pydictor built-in tool to safe delete, merge, unique, merge and unique,  count word frequency to filter the wordlist, besides, you also can specify your wordlist and use ‘-tool handler’ to filter your wordlist.
2. highly customized
You can generate highly customized and complex wordlist by modify multiple configuration files, add your own dictionary, using leet mode, filter by length、char occur times、types of different char、regex, even customized own encryption function by modify /lib/fun/encode.py test_encode function. its very relevant to generate good or bad password wordlist with your customized rules and skilled use of pydictor.
 
3. powerful and flexible configuration file parsing
 nothing to say,skilled use and you will love it.
4.great compatibility
whether you are using Python 2.7 version or Python 3.x version , pydictor can be run on Windows, Linux or Mac.
Start:
git clone --depth=1 --branch=master https://www.github.com/landgrey/pydictor.git
cd pydictor/
chmod 755 pydictor.py
python pydictor.py

Overview:

Quick to use:

types of generate wordlist(14 types)and descriptions

wordlist type number description
base 1 basic wordlist
char 2 custom character wordlist
chunk 3 permutation and combination wordlist
conf 4 based on configuration file wordlist
sedb 5 social engineering wordlist
idcard 6 id card last 6/8 char wordlist
extend 7 extend wordlist based on rules
scratch 8 wordlist based on web pages keywords
passcraper 9 wordlist against to web admin and users
handler 10 handle the input file generate wordlist
uniqifer 11 unique the input file and generate wordlist
counter 12 word frequency count wordlist
combiner 13 combine the input file generate wordlist
uniqbiner 14 combine and unique the input file generate wordlist

function and scope of support wordlist number

function support number description
len 1 2 3 4 5 6 7 9 10 11 12 14 lenght scope
head 1 2 3 4 5 6 7 9 10 11 12 14 add items prefix
tail 1 2 3 4 5 6 7 9 10 11 12 14 add items suffix
encode 1 2 3 4 5 6 7 9 10 11 12 14 encode the items
occur 3 4 5 7 9 10 11 12 14 filter by occur times of letter、digital、special chars
types 3 4 5 7 9 10 11 12 14 filter by types of letter、digital、special chars
regex 3 4 5 7 9 10 11 12 14 filter by regex
level 5 7 9 set the wordlist level
leet 5 7 9 1337 mode

usage examples

1: generate the basic wordlsit based on digital lenght of 4

python pydictor.py -base d --len 4 4 --output D:\exits\or\not\dict.txt

2: encode the wordlist

python pydictor.py -base c --len 1 3 --encode b64

3: use d(digital) L(lowercase letter) c(capital letter) generating wordlist

python pydictor.py -base dLc -o /awesome/pwd

4: use customized characters generating wordlist

python pydictor.py -char "abc123._@ " --len 1 3 --tail @site

5: generate permutation and combination wordlist

python pydictor.py -chunk abc ABC 666 . _ @ "'" --head a --tail 123 --encode md5

6. extend wordlist based on rules

  1. extend function mainly directed against web application administrator to generate password
  2. You can put your own weak password wordlist in wordlist/Web,extend function will auto unique them,new wordlist will contains them
  3. You can modify funcfg/extend.conf,set prefix, suffix, prefix + suffix and middle word when extended
  4. extend function support leet mode,pick by level and pick by lenght function,you can learn more in the following

write the following information to ‘/names.txt’

liwell
shelly
bianji
webzhang

run command

python pydictor.py -extend /names.txt --leet 0 1 2 11 21 --level 1 --len 4 16 --occur "<=10" ">0" "<=2" -o /possbile/wordlist.lst

7: id card last 6/8 char wordlist

pydictor.py -plug pid6 --types ">=0" ">=4" ">=0" --encode b64

note: default sex =’all’, it decided by lib/data/data.py default_sex, and ‘m’ is Male, ‘f’ is Female

8: using passcraper plugin crawl website generating password wordlist based on plain text found and extend rules

  1. the rules of passcraper plug and extend function are the same
  2. passcraper plug will generate two wordlist,preffix with SCRATCH is raw wordlist by website plain text, and if you feel that there are a lot of unrelated words in the SCRATCH wordlist, you can remove them, and then use the extend function to specify the new file to generate dictionary again.
  3. you can modify the funcfg/passcraper_blacklist.conf file,add or delete useless words that need to be filtered out, and also can modify lib/data/data.py file passcraper_filter argument,change the filter regular expressions
  4. with same extend function,you can put your weak password in /wordlist/Web,new wordlist will contains them
python pydictor.py -plug passcraper    using default file scraper.sites as multi-input file
python pydictor.py -plug passcraper http://www.example.com

9. using configuration file build dictionary

this function contains all of “-base” and “-char” capacities,and more precise control

python pydictor.py --conf                           using default file funcfg/build.conf build the dictionary
python pydictor.py --conf /my/other/awesome.conf    using /my/other/awesome.conf build the dictionary

note: parsing rules details as following,besides referred to build.conf file

configuration parsing rules details:

 1. the basic unit of parsing is called an parsing element, an parsing element includes five elements, namely: head, character set, length range, encoding, tail, which can be omitted both head and tail;
A standard parsing element:head[characters]{minlength,maxlength}<encode-type>tail,a example parsing element:a[0-9]{4,6}<none>_
Its meaning build a dictionary that  prefix is "a" , character set is 0—9, don't encode,length range is 4—6 and  suffix is "_"
 2. current is support parsing one line
 3. one line can contains 10 parsing elements
such as:[4-6,a-c,A,C,admin]{3,3}<none>_[a,s,d,f]{2,2}<none>[789,!@#]{1,2}<none>,it contains three parsing elements
 4. if annotator "#" in first place, program won't parse this line
 5. conf function can build more precise dictionary up to single char

about character sets:
       You can add the "-" in the middle of character sets beginning and ending to  join them
       and can also use "," to separate multiple character sets, or a single character, or a single string, as an element of the character set;

supported encoding:
      none    don't encode
      b64     base64
      md5     md5 digest algorithm output 32 char
      md516   md5 digest algorithm output 16 char
      sha1    sha1 digest algorithm
      url     urlencode
      sha256  sha256 digest algorithm
      sha512  sha512 digest algorithm

10. handle wordlist’s tools

filter tool handler
specify the input file, and output the handled file

python pydictor.py -tool handler /wordlist/raw.txt --len 6 16 --occur "" "=6" "<0" --encode b64 -o /wordlist/ok.txt

safe delete tool shredder

python pydictor.py -tool shredder   delete the currently specified output path(default:results) files and all its dictionary files
python pydictor.py -tool shredder base   delete the files of it's prefix is "BASE" in currently specified output path

prefix(case insensitive) range in 14 items: base,char,chunk,conf,sedb,idcard,extend,handler,uniqifer,counter,combiner,uniqbiner,scratch,passcraper
besides,you can safe shred files or whole directory as following:

python pydictor.py -tool shredder /data/mess
python pydictor.py -tool shredder D:\mess\1.zip

for improving the security delete speed, the default uses 1 times to erase and rewrite,you can modify lib/data/data.py file’s file_rewrite_count and dir_rewrite_count value

remove duplicates tool uniqifer

python pydictor.py -tool uniqifer /tmp/my.dic

word frequency statistics tool counter

python pydictor.py -tool counter vs /tmp/mess.txt 100  select 100 words in /tmp/mess.txt file that appear in the most times and output to the terminal and saved to file

note: default choose 100 items to print or save;default separator is:”\n”,you can modify counter_split value in lib/data/data.py file

merge dictionary tool combiner

python pydictor.py -tool combiner /my/messdir

remove duplicates after merging tool uniqbiner

python pydictor.py -tool uniqbiner /my/messdir

11: wordlist filter

filter by level function

  1. this function is currently only support extend function, passcraper plug, Social Engineering Dictionary Builder
  2. default level is 3, the lower level, the lower possibility, the more items
  3. modify funcfg/extend.conf file,customized your awesome level rules
python pydictor.py -extend bob adam sarah --level 5

use leet mode

  1. this function is currently only support extend, passcraper, Social Engineering Dictionary Builder
  2. all default unable to use leet mode, when enable, you can use multiple code at one time
  3. SEDB can enable leet mode and set code in SEDB interface
  4. enable leet mode cannot make wordlist decrease,it will increase wordlist on the basis of unable to use the leet mode

default leet table

leet char = replace char
a = 4
b = 6
e = 3
l = 1
i = 1
o = 0
s = 5

code

0   default,replace all
1   left-to-right, replace all the first encountered leet char
2                right-to-left, replace all the first encountered leet char
11-19   left-to-right, replace the first encountered leet char to maximum code-10 chars
21-29   right-to-left, replace the first encountered leet char to maximum code-20 chars

code effection table

code old string new string
0 as a airs trees 45 4 41r5 tr335
1 as a airs trees 4s 4 4irs trees
2 as a airs trees a5 a air5 tree5
11 as a airs trees 4s a airs trees
12 as a airs trees 4s 4 airs trees
13 as a airs trees 4s 4 4irs trees
14 as a airs trees 4s 4 4irs trees
as a airs trees 4s 4 4irs trees
21 as a airs trees as a airs tree5
22 as a airs trees as a air5 tree5
23 as a airs trees a5 a air5 tree5
24 as a airs trees a5 a air5 tree5
as a airs trees a5 a air5 tree5

besides,you also can:

modify /funcfg/leet_mode.conf, add or delete leet table items;
modify /lib/lib/data.py, extend_leet、passcraper_leet、sedb_leet arguments, choose some functions whether default use leet mode;
modify /lib/data/data.py,leet_mode_code argument, choose default mode code;

filter by occur times of letter、digital、special chars

--occur [scope of occur letter times] [scope of occur digital times] [scope of occur special chars times]

default occur times

"<=99" "<=99" "<=99"

filter by types of letter、digital、special chars

 --types [scope of letter types] [scope of digital types] [scope of special types]

default types

">=0" ">=0" ">=0"

12. social engineering dictionary

python pydictor.py --sedb
                              _ _      _
              _ __  _   _  __| (_) ___| |_ ___  _ __
             | '_ \| | | |/ _` | |/ __| __/ _ \| '__|
             | |_) | |_| | (_| | | (__| || (_) | |
             | .__/ \__, |\__,_|_|\___|\__\___/|_|
             |_|    |___/

                   Social Engineering Dictionary Builder
                                            Build by LandGrey
    ----------------------------[ command ]----------------------------
    [+]help desc             [+]exit/quit            [+]clear/cls
    [+]show option           [+]set option arguments [+]rm option
    [+]len minlen maxlen     [+]head prefix          [+]tail suffix
    [+]encode type           [+]occur L d s          [+]types L d s
    [+]regex string          [+]level code           [+]leet code
    [+]output directory      [+]run

    ----------------------------[ option ]----------------------------
    [+]cname                 [+]ename                [+]sname
    [+]birth                 [+]usedpwd              [+]phone
    [+]uphone                [+]hphone               [+]email
    [+]postcode              [+]nickname             [+]idcard
    [+]jobnum                [+]otherdate            [+]usedchar

pydictor SEDB>>

command:

help                reload interface
help desc           view the meaning for each items
exit or quit        exit the program
clear or cls        clear screen
show                view the current settings
set                 set option value
rm                  remove option value
len                 select the length range
head                add prefix
tail                add suffix
encode              encode items
occur               set occur times of letter、digital、special chars
types               set types of letter、digital、special chars
regex               filter by regex
level               select the extend level value
leet                enable leet mode and choose code
output              set output dictionary or file path
run                 build wordlist

if you have some information about someone

information items value
chinese name 李伟
pinyin name liwei
simple name lw
simple name Lwei
english name zwell
birthday 19880916
used password liwei123456.
used password liwei@19880916
used password lw19880916_123
used password abc123456
phone number 18852006666
used phone number 15500998080
home phone 76500100
company phone 010-61599000
email account 33125500@qq.com
email account 13561207878@163.com
email account weiweili@gmail.com
email account wei010wei@hotmail.com
home postcode 663321
now place postcode 962210
common nickname zlili
id card number 152726198809160571
student id 20051230
job number 100563
father birthday 152726195910042816
mother birthday 15222419621012476X
boy/girl friend brithday 152726198709063846
friend brithday 152726198802083166
pet name tiger
crazy something games of thrones
special meaning numbers 176003
special meaning chars m0n5ter
special meaning chars ppdog

▼Advertisements

now, use follwing command:

python pydictor.py --sedb
set cname liwei
set sname lw Lwei
set ename zwell
set birth 19880916
set usedpwd liwei123456. liwei@19880916 lw19880916_123
set phone 18852006666
set uphone 15500998080
set hphone 76500100 61599000 01061599000
set email 33125500@qq.com
set email 13561207878@163.com
set email weiweili@gmail.com
set email wei010wei@hotmail.com
set postcode 663321 962210
set nickname zlili
set idcard 152726198809160571
set jobnum 20051230 100563
set otherdate 19591004 19621012
set otherdate 19870906 19880208
set usedchar tiger gof gamesthrones 176003 m0n5ter ppdog

view the configuration, and build the wordlist

show
run

if you want more items wordlist, use

level 1

and, you want to filter some impossible password,
set the password lenght

len 1 16

at least one letter and at most three special char,

occur ">0" "" "<=3"

and at most two types of special char in one item,

types "" "" "<=2"

finaly, specify the output path, build wordlist again

output D:\awesome\dict\liwei_pass.txt
run

note:

  1. you can modify funcfg/sedb_tricks.conf file,change the word transform prefix, suffix and prefix+suffix rules
  2. you can put your own individual weak password wordlist in wordlist/SEDB,
  3. SEDB some little rules contains extend function


The post pydictor – A Powerful and Useful Hacker Dictionary Builder for a Brute-Force Attack appeared first on DigitalMunition.

iOS macOS Remote Administration Tool: EggShell

$
0
0
i

EggShell is an iOS and macOS post exploitation surveillance pentest tool written in Python. This tool creates 1 line multi stage payloads that give you a command line session with extra functionality. EggShell gives you the power and convenience of uploading/downloading files, taking pictures, location tracking, shell command execution, persistence, escalating privileges, password retrieval, and much more. Server communication features end to end encryption with 128 bit AES and the ability to handle multiple clients. This is a proof of concept pentest tool, intended for use on machines you own.


Creating And Running A Payload

EggShell gives us a convenient 1 line payload and listener on our local machine

Installation

git clone https://github.com/neoneggplant/EggShell && cd EggShell
easy_install pycrypto
python eggshell.py


iOS Commands:

  • sysinfo : get system information
  • cd : change directories
  • ls : list contents of directory
  • rm : delete file
  • pwd : get current directory
  • download : download file
  • upload : upload file
  • frontcam : take picture through front camera
  • backcam : take picture through back camera
  • mic : record microphone
  • getpid : get process id
  • vibrate : make device vibrate
  • alert : make alert show up on device
  • say : make device speak
  • locate : get device location
  • respring : respring device
  • setvol : set mediaplayer volume
  • getvol : view mediaplayer volume
  • isplaying : view mediaplayer info
  • openurl : open url on device
  • dial : dial number on device
  • getsms : download sms database
  • getnotes : download notes database
  • getcontacts : download addressbook
  • battery : get battery level
  • listapps : list bundle identifiers
  • open : open app
  • persistence : installs LaunchDaemon – tries to connect every 30 seconds
  • rmpersistence : uninstalls LaunchDaemon
  • open : open app
  • installpro : installs eggshellpro to device


EggShell Pro Commands (iOS)

  • lock : simulate lock button press
  • wake : wake device from sleeping state
  • home : simulate home button press
  • doublehome : simulate home button double press
  • play : plays music
  • pause : pause music
  • next : next track
  • prev : previous track
  • togglemute : programatically toggles silence switch
  • ismuted : check if we are silenced or not
  • islocked : check if device is locked
  • getpasscode : log successfull passcode attempts
  • unlock : unlock with passcode
  • keylog : log keystrokes
  • keylogclear : clear keylog data
  • locationservice: turn on or off location services

▼Advertisements

macOS Commands

  • cd : change directories
  • ls : list contents of directory
  • rm : delete file
  • pwd : get current directory
  • download : download file
  • upload : upload file
  • getpaste : get pasteboard contents
  • mic : record mic
  • picture : take picture through iSight
  • screenshot : take screenshot
  • getfacebook : retrieve facebook session cookies
  • brightness : adjust screen brightness
  • getvol : get output volume
  • setvol : set output volume
  • idletime : get the amount of time since the keyboard/cursor were touched
  • keyboard : your keyboard -> is target’s keyboard
  • imessage : send message through the messages app
  • openurl : open url through the default browser
  • play : tell iTunes to play
  • pause : tell iTunes to pause
  • prev : tell iTunes to play previous track
  • next : tell iTunes to play next track
  • pid : get process id
  • prompt : prompt user to type password
  • su : su login
  • persistence : attempts to connect back every 60 seconds
  • rmpersistence : removes persistence


Local Commands

  • lls : list contents of local directory
  • lcd : change local directories
  • lpwd : get current local directory
  • lopen : open local directory
  • clear : clears terminal


http://lucasjackson.me/index.php/eggshell/

https://github.com/neoneggplant/EggShell

The post iOS macOS Remote Administration Tool: EggShell appeared first on DigitalMunition.

BadIntent – Intercept, Modify, Repeat and Attack Android’s Binder Transactions Using Burp Suite

$
0
0
b
BadIntent is the missing link between the Burp Suite and the core Android’s IPC/Messaging-system. BadIntent consists of two parts, an Xposed-based module running on Android and a Burp-plugin. Based on this interplay, it is possible to use the Burp’s common workflow and all involved tools and extensions, since the intercept and repeater functionality is provided. BadIntent hooks deeply into the Android system, performs various method redirections in Parcels and adds additional services to provide the described features. Most notably, BadIntent works system-wide (experimental) and is not restricted to individual user apps.


BadIntent can used to perform various pentesting activities such as the following examples:


Installation
The most handy approach is to install BadIntent Android from the Xposed Module Repository and BadIntent Burp from the Burp’s BApp Store. Both will be made available/submitted during the Arsenal presentation of BadIntent in Black Hat Las Vegas 2017.

▼Advertisements

Environment
BadIntent has been tested on Genymotion with Xposed v87 on Android Marshmallow (6.0) and Burp Suite 1.7.23 (Free and Pro).
There are known limitations in hooking all system apps and all interfaces. During the boot proccess the Android system will remain in a boot loop and you will not be able to uninstall BadIntent from your Android device. Therefore, it is strongly recommended to use the mentioned setup in case all system apps are hooked.
Configuration & Usage
Please refer to the wiki for more details.


The post BadIntent – Intercept, Modify, Repeat and Attack Android’s Binder Transactions Using Burp Suite appeared first on DigitalMunition.

A WebSocket Manipulation Proxy: WSSiP

$
0
0
w

Short for “WebSocket/Socket.io Proxy”, this tool, written in Node.js, provides a user interface to capture, intercept, send custom messages and view all WebSocket and Socket.IO communications between the client and server.  Upstream proxy support also means you can forward HTTP/HTTPS traffic to an intercepting proxy of your choice (e.g. Burp Suite or Pappy Proxy) but view WebSocket traffic in WSSiP. More information can be found on the blog post.

There is an outward bridge via HTTP to write a fuzzer in any language you choose to debug and fuzz for security vulnerabilities.


Installation


From npm/yarn (for CLI commands)

Run the following in your command line:

npm:

# Install Electron globally
npm i -g electron@1.7

# Install wssip global for "wssip" command
npm i -g wssip

# Launch!
wssip

yarn: (Make sure the directory in yarn global bin is in your PATH)

yarn global add electron@1.7
yarn global add wssip
wssip

You can also run npm install electron (or yarn add electron) inside the installed WSSiP directory if you do not want to install Electron globally, as the app packager requires Electron be added to developer dependencies.

▼Advertisements

Usage

  1. Open the WSSiP application.
  2. WSSiP will start listening automatically. This will default to localhost on port 8080.
  3. Optionally, use Tools > Use Upstream Proxy to use another intercepting proxy to view web traffic.
  4. Configure the browser to point to http://localhost:8080/ as the HTTP Proxy.
  5. Navigate to a page using WebSockets. A good example is the WS Echo Demonstration.
  6. ???
  7. Potato.


https://github.com/nccgroup/wssip

The post A WebSocket Manipulation Proxy: WSSiP appeared first on DigitalMunition.


jSQL – Automatic SQL Injection Tool In Java

$
0
0
j

jSQL is an automatic SQL Injection tool written in Java, it’s lightweight and supports 23 kinds of database.

It is free, open source and cross-platform (Windows, Linux, Mac OS X) and is easily available in Kali, Pentest Box, Parrot Security OS, ArchStrike or BlackArch Linux.

Features

  • Automatic injection of 23 kinds of databases:
    • Access
    • CockroachDB
    • CUBRID
    • DB2
    • Derby
    • Firebird
    • H2
    • Hana
    • HSQLDB
    • Informix
    • Ingres
    • MaxDB
    • Mckoi
    • MySQL{MariaDb}
    • Neo4j
    • NuoDB
    • Oracle
    • PostgreSQL
    • SQLite
    • MS SQL Server
    • Sybase
    • Teradata
    • Vertica
  • Multiple injection strategies: Normal, Error, Blind and Time
  • SQL Engine to study and optimize SQL expressions
  • Injection of multiple targets
  • Search for administration pages
  • Creation and visualisation of Web shell and SQL shell
  • Read and write files on host using injection
  • Bruteforce of password’s hash
  • Code and decode a string

Installation

Install Java 8, then download the latest release of jSQL Injection and double-click on the file jsql-injection-v0.79.jar to launch the software. You can also type java -jar jsql-injection-v0.79.jar in your terminal to start the program. If you are using Kali Linux then get the latest release using commands apt update then apt full-upgrade.

▼Advertisements

Future Roadmap

  • Netezza Support
  • Test coverage with Jacoco
  • Integration test with Docker and JPA Hibernate Jooq
  • Maven
  • Core swing CLI
  • Full Path Disclosure
  • DIOS RoutedQuery OOB UpdateInsertDelete
  • Bruteforce HTTP Auth using NTLM
  • Arabic translation
  • Command-line interface
  • Dictionary attack
  • WAF Detection
  • Program self-updater

You can download jSQL here:

jsql-injection-v0.79.jar

Or read more here.

The post jSQL – Automatic SQL Injection Tool In Java appeared first on DigitalMunition.

Packet Manipulation Framework: PcapPlusPlus

$
0
0
p

PcapPlusPlus is a multiplatform C++ network sniffing and packet parsing and manipulation framework. PcapPlusPlus is meant to be lightweight, efficient and easy to use.


What makes PcapPlusPlus different from similar C++ wrappers for libpcap/WinPcap?

  • Designed to be lightweight and efficient
  • Support for DPDK fast packet processing engine which enables packet capturing and transmition in line rate using kernel bypass
  • Support for ntop’s PF_RING packet capturing engine that dramatically improves the packet capture speed
  • Support for parsing and editing of many protocols, including L7 protocols like HTTP and SSL/TLS
  • Unique implementation of TCP reassembly logic which includes support of TCP retransmission, out-of-order TCP packets and missing TCP data
  • Support for Remote Capture capabilities on Windows (using RPCAP protocol supported in WinPcap)
  • Support for reading and writing PCAPNG files (a lot more more than currently supported in WinPcap/libpcap)
  • Vast object-oriented filtering mechanism that makes libpcap filters a lot more user-friendly (no need to know the exact filter string to use)


PcapPlusPlus is currently supported on WindowsLinux and Mac OS X. It was tested on the following platforms:

  • Windows:
    • Microsoft Visual Studio 2015 (32-bit + 64-bit compilation)
    • MinGW32 (32-bit compilation only)
    • MinGW-w64 (32-bit compilation only)
  • Linux:
    • Ubuntu (12.04 LTS, 14.04 LTS, 16.04 LTS, 14.10)
    • Fedora
    • CentOS
    • It should work on other Linux distributions as well
  • Mac OS X:
    • Yosemite (10.10)
    • El Capitan (10.11)
    • Sierra (10.12)


Supported packet capture engines

PcapPlusPlus currently works with the following packet capture engines:

  • libpcap live capture (on Linux and Mac OS X)
  • WinPcap live capture (on Windows)
  • ntop’s Vanilla PF_RING engine (on Linux)
  • Intel DPDK engine (on Linux)
  • WinPcap Remote live capture (on Windows)
  • PCAP and PCAPNG file devices (reading and writing)

▼Advertisements

Supported protocols

The Packet++ library currently supports parsing, editing and creation of packets of the following protocols:

  • Ethernet
  • SLL (Linux cooked capture)
  • Null/Loopback
  • Raw IP (IPv4 & IPv6)
  • IPv4
  • IPv6
  • ARP
  • VLAN
  • VXLAN
  • MPLS
  • PPPoE
  • GRE
  • TCP
  • UDP
  • ICMP
  • IGMP (IGMPv1, IGMPv2 and IGMPv3 are supported)
  • DNS
  • DHCP
  • HTTP headers (request & response)
  • SSL/TLS – parsing only (no editing capabilities)
  • Generic payload


Packet And Network Utilities

  • TCP reassembly logic
  • Packet hash key creation (by 5-tuple and 2-tuple)
  • Retrieve remote machine MAC address using ARP protocol
  • Retrieve host IPv4 address by using DNS protocol
  • Checksum calculation


https://github.com/seladb/PcapPlusPlus

The post Packet Manipulation Framework: PcapPlusPlus appeared first on DigitalMunition.

Vulscan – Advanced vulnerability scanning with Nmap NSE

$
0
0
v
Vulscan is a module which enhances nmap to a vulnerability scanner. The nmap option -sV enables version detection per service which is used to determine potential flaws according to the identified product. The data is looked up in an offline version of VulDB.

Installation
Please install the files into the following folder of your Nmap installation:

Nmap\scripts\vulscan\*

Usage
You have to run the following minimal command to initiate a simple vulnerability scan:

nmap -sV --script=vulscan/vulscan.nse www.example.com

Vulnerability Database
There are the following pre-installed databases available at the moment:

Single Database Mode
You may execute vulscan with the following argument to use a single database:

--script-args vulscandb=your_own_database

It is also possible to create and reference your own databases. This requires to create a database file, which has the following structure:

<id>;<title>

Just execute vulscan like you would by refering to one of the pre-delivered databases. Feel free to share your own database and vulnerability connection with me, to add it to the official repository.

Update Database
The vulnerability databases are updated and assembled on a regularly basis. To support the latest disclosed vulnerabilities, keep your local vulnerability databases up-to-date.
If you want to update your databases, go to the following web site and download these files:

Copy the files into your vulscan folder:

/vulscan/

Version Detection
If the version detection was able to identify the software version and the vulnerability database is providing such details, also this data is matched.
Disabling this feature might introduce false-positive but might also eliminate false-negatives and increase performance slighty. If you want to disable additional version matching, use the following argument:

--script-args vulscanversiondetection=0

Version detection of vulscan is only as good as Nmap version detection and the vulnerability database entries are. Some databases do not provide conclusive version information, which may lead to a lot of false-positives (as can be seen for Apache servers).

Match Priority
The script is trying to identify the best matches only. If no positive match could been found, the best possible match (with might be a false-positive) is put on display.
If you want to show all matches, which might introduce a lot of false-positives but might be useful for further investigation, use the following argument:

--script-args vulscanshowall=1

Interactive Mode
The interactive mode helps you to override version detection results for every port. Use the following argument to enable the interactive mode:

--script-args vulscaninteractive=1

▼Advertisements

Reporting
All matching results are printed one by line. The default layout for this is:

[{id}] {title}\n

It is possible to use another pre-defined report structure with the following argument:

--script-args vulscanoutput=details
--script-args vulscanoutput=listid
--script-args vulscanoutput=listlink
--script-args vulscanoutput=listtitle

You may enforce your own report structure by using the following argument (some examples):

--script-args vulscanoutput='{link}\n{title}\n\n'
--script-args vulscanoutput='ID: {id} - Title: {title} ({matches})\n'
--script-args vulscanoutput='{id} | {product} | {version}\n'

Supported are the following elements for a dynamic report template:

  • {id} – ID of the vulnerability
  • {title} – Title of the vulnerability
  • {matches} – Count of matches
  • {product} – Matched product string(s)
  • {version} – Matched version string(s)
  • {link} – Link to the vulnerability database entry
  • \n – Newline
  • \t – Tab

Every default database comes with an url and a link, which is used during the scanning and might be accessed as {link} within the customized report template. To use custom database links, use the following argument:

--script-args "vulscandblink=http://example.org/{id}"

Disclaimer
Keep in mind that this kind of derivative vulnerability scanning heavily relies on the confidence of the version detection of nmap, the amount of documented vulnerebilities and the accuracy of pattern matching. The existence of potential flaws is not verified with additional scanning nor exploiting techniques.

The post Vulscan – Advanced vulnerability scanning with Nmap NSE appeared first on DigitalMunition.

BadIntent – Intercept, Modify, Repeat and Attack Android’s Binder Transactions Using Burp Suite

$
0
0
b
BadIntent is the missing link between the Burp Suite and the core Android’s IPC/Messaging-system. BadIntent consists of two parts, an Xposed-based module running on Android and a Burp-plugin. Based on this interplay, it is possible to use the Burp’s common workflow and all involved tools and extensions, since the intercept and repeater functionality is provided. BadIntent hooks deeply into the Android system, performs various method redirections in Parcels and adds additional services to provide the described features. Most notably, BadIntent works system-wide (experimental) and is not restricted to individual user apps.
BadIntent can used to perform various pentesting activities such as the following examples:


Installation
The most handy approach is to install BadIntent Android from the Xposed Module Repository and BadIntent Burp from the Burp’s BApp Store. Both will be made available/submitted during the Arsenal presentation of BadIntent in Black Hat Las Vegas 2017.

▼Advertisements

Environment
BadIntent has been tested on Genymotion with Xposed v87 on Android Marshmallow (6.0) and Burp Suite 1.7.23 (Free and Pro).
There are known limitations in hooking all system apps and all interfaces. During the boot proccess the Android system will remain in a boot loop and you will not be able to uninstall BadIntent from your Android device. Therefore, it is strongly recommended to use the mentioned setup in case all system apps are hooked.
Configuration & Usage
Please refer to the wiki for more details.


The post BadIntent – Intercept, Modify, Repeat and Attack Android’s Binder Transactions Using Burp Suite appeared first on DigitalMunition.

faker.js – Tool To Generate Fake Data For Testing

$
0
0
f

faker.js is a tool to generate fake data in Node.js and in the browser, it has a lot of different data types to enable you to generate very customised and complete sets of fake or mock data for testing purposes.


It also supports multiple languages and locales and can generate a lot of data types to fit your use case.


Data Types

  • address
  • commerce
  • company
  • database
  • date
  • finance
  • hacker
  • helpers
  • image
  • internet
  • lorem
  • name
  • phone
  • random
  • system

Usage

Browser

Node.js

You can download faker.js here:

faker.js-v4.1.0.zip

Or read more here.

The post faker.js – Tool To Generate Fake Data For Testing appeared first on DigitalMunition.

Viewing all 236 articles
Browse latest View live